Tuesday, July 19, 2011

Mask Maker, Mask Maker, Make me a Mask!

While in Venice, Italy we wandered through the narrow cobble stone streets to find the Mask Maker's shop tucked away in a quiet corner. Once there and through the large hand carved wooden door, the room expanded into a vaulted ceiling with masks galore dangling from the rafters. If you lack an affinity for clowns this would not be the place for you...

We all got settled in our seats and waited for instruction to begin. The process was simple, the mask base was pre-made in numerous shapes and styles. We selected what style we wanted, the metallic under coat for it to be sprayed (instead of foiled - due to time constraints) and then picked the colors we wanted to paint and our designs were up to our imaginations.  After all the painting was complete we had our choice of glitter colors to add dimension to the masks.

Amazing sketches on the studio walls.

Cheese kids!
I selected a feminine mask with some flare above the right eyebrow. I was in the mood for turquoise because of the shirt I was sporting that day, and a few polka-dots seemed like a great decision. Lets get started:
Blank Canvas

Silver Metallic Undertones
Paint, Paint, Paint.
Polka-Dots...I think so!

Paint was taking a little time to dry...
Almost there!
Before I added the final touches to my mask it needed a bit of time to dry.  It seemed like the perfect opportunity to sneak around and look at all the other people's work! Some examples are below:

I love how different each mask is!

Why soooo serious.....?

So many great ideas with different styles and colors - awesome work! A few pictures of my finished mask follow - stay tuned for more from my trip to Italy!


So much fun! :)

Thursday, July 7, 2011

Veggies and Rice and Everything Nice!

I've been going through pictures from my trip and putting together an Italian food blog, however in the process I made one of my favorite healthy recipes - so I thought I'd share.  This "Veggies and Rice and everything Nice" meal is about the easiest thing on the planet to make,  it comes out looking like you've labored in the kitchen for hours - which makes the people who eat it appreciate you THAT much more :). Did I mention it tastes amazing!? Now you'll notice from the pictures I've done a great job of keeping the images cropped in tight to hide the mess I tend to make in the kitchen! I may not be a tidy cook but thats what dogs (I mean brooms) are for ;)!

Ingredients you'll need:

Fat Free Italian Dressing (get the no name brand and save 2 bucks - $1.99)!
"Rice Sides" Herb and Butter Packaged Rice (Walmart $1.00)
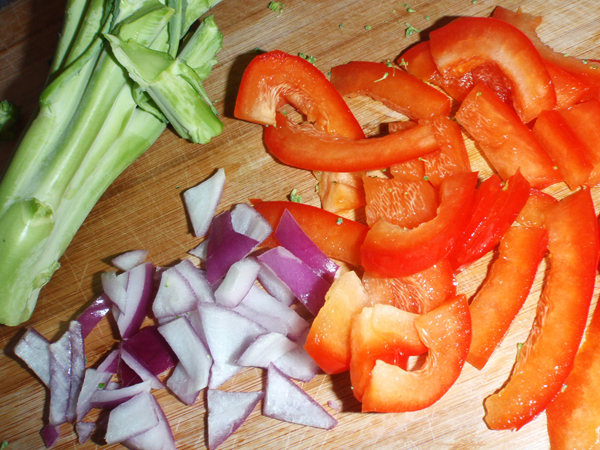
Veggies of your liking I chose : Sliced Baby Portabella Mushrooms, Peppers, Red Onions, Broccoli, and Zucchini. (about $5.00 for all of these)
Seasoning to taste (I recommend Mrs Dash)

Total cost for 2 Meals = $8.00

To start you will take your Portabella Mushrooms and put them in the skillet. Cover with about a 1/4 cup of FF italian Dressing. I don't use any oil or butter when I cook the FF dressing will keep the mushrooms moist enough so they don't burn. You'll want to stir them around for about 5 minutes on a medium heat. While the mushrooms are cooking get your water boiling for the rice.

Follow the VERY SIMPLE instructions on the rice bag.  It should only take 7 minutes to cook and then it will be just the right temperature when your veggies are complete.  If the rice you use calls for any additional oil leave it out. Water is all you need to cook rice.

Now that your rice is off and running, get your knife and start chopping! Start with veggies that have less of a water content and will take longer to cook such as broccoli.  Slice the zucchini thin enough that it will get tender, cut strips of peppers after taking the seeds out, and finish with the red onions for a bit of sweetness.


Once all the veggies are added to the skillet add about 1/4 cup additional FF Italian Dressing to the mix. Turn the heat to medium/high and continue to move the veggies around in the skillet so they brown and dont burn.  Now the fun part - seasoning!

All of my friends always ask how I make veggies taste so good.  Well the trick is - seasoning! I'm a vegetarian so I consume a TON of veggies - if they tasted bland I wouldn't know what to eat.  A good rule of thumb to go by is this : IF YOU LIKE THE WAY THE SPICE SMELLS, YOU'LL LIKE THE WAY IT TASTES. Don't be afraid to experiment you'll get it wrong sometimes but once you figure out what you like, you'll be golden! My go to spices are as follows:

Tomato Basil and Garlic by Mrs Dash (this line has some amazing seasonings)
Sea salt
Pepper
Dried Basil

Generously cover the veggies in the skillet the spices you choose. Go heavy on the spice because it will mild out as you cook. If at any point your veggies start to get a bit dry add more FF dressing to the skillet and continue to move the veggies around.

Oh - look at that! Your rice is done. Take it off the burner and allow it to firm up while it cools. Your veggies should be making a sauce at this point and be simmering on the stove top. Like this:

Wow - I'm getting hungry just looking at this post! The awesome thing about not using oil is that none of this meal feels heavy or tastes greasy.  The FF italian dressing actually starts to caramelize as you near the end of the veggie cooking.  Your heat should still be at Medium to High and you'll start to see the veggies stick a bit to the bottom of the pan and brown. If the veggies are done you should have a film around the edges of the skillet from the veggie juice and FF dressing making the sauce. Let the veggies cool for about 5 minutes and once done serve!

While the rice is still hot, press it into a 3/4 measuring cup to form it into these awesome rice cups.  Makes the meal look that much more professional! :) Garnish with pieces of veggies on top and your meal is complete.  For more ideas for meals check out my sister's blog : Cheesecake Yum! Next time I post a recipe it's going to be my WORLD FAMOUS pizza on the grill! I know you'll be waiting with drool dripping down your mouths!


Thursday, June 30, 2011

Graffiti : Urban Street Art in Italy

A Dumpster in Florence.
My trip to Italy was amazing.  At this point I'm still recovering a bit and catching up on sleep.  While going through all of the 869 images I took during my travels I tried to find themes that I could blog about.  Putting the whole trip into one blog would be overwhelming.  So for the next 5-10 blogs I'll be picking one topic and writing about the images and sites I saw that made Italy so inspiring.  A few of the topics I'm considering: Graffiti, Stray Pets, Book Making, Mask Making, Glass Blowing, Sketch book entries, Architecture, Food, Flowers, Favorite Images, and finally Italy start to finish...We'll see how many months it takes me to get all of these posted :)!

Divider wall on the road to Rome from the bus window.

When I first arrived in Rome, I was taken aback by all of the Graffiti. I knew Rome for it's historical sites and gorgeous architecture, museums and crystal blue fountains, however I wasn't prepared for all of Rome's beauty to be covered with paint.  The more I looked around the Graffiti began to transition from what seemed like vandalism to amazing works of urban art.  The marks didn't always make since but the juxtaposition of historical buildings with their angular elegance covered in bright paint splashes of free moving motion-full expression was breathtaking.

Random building entrance on the streets of Cortona.
I learned that Graffiti actually originated in ancient Italy.  As sculptures and buildings were being erected graffiti was finding its way onto each piece taking shape as inscriptions and drawings and making a stir while it did.  Some of the earliest Graffiti examples were found on the ruins of Pompeii in 1851. The wonderful thing about the Italians is that they consider Graffiti an urban art form, whereas many people in the US see it as vandalism.  Still today as you walk the streets of Italy you can see art in motion with Artists creating their master pieces, even if only for a fleeting moment, on the streets, walls, and ruins that surround you.

Eistein Street Art in the Florence Shopping District.

Calicio Storico parade before the street fight.

Chalk Drawing on the interior wall of the Murano Glass Museum.

Exit of the Museum, giving this guy a smooch!

Stone, Brick and Graffiti.

Letter Glass Art on the Walls and Floor in Murano.

Street art and killer pants.

10 foot tall handwritten title of an exhibit at the Venice Biennale.

Pushing the arrow in just a little bit deeper...

Geometric stair rail with stone and graffiti markings.

Monday, June 13, 2011

ITALY Bags are Packed...Almost!

Can you tell which one is my "purse" and which is my "Carry on" Ha!
Alright one picture before I go. It's been a crazy weekend of market work, seeing friends before I leave, and eating WAY too much food with my family :)! My Mom made a strawberry pie to send me off and it tasted delicious! One last quick run to Target and Walmart and I should be sufficiently "stuffed" into my bags!

As you can see my bags are almost packed....might need to weed out a couple items in order to stuff it all in the overhead bins.  I will say - only bringing 2 pairs of shoes for a 2.5 week vacation is pretty GREAT in my book! Now let's just hope they don't tear my feet up on the cobble stone streets of Italy! :)

I can't wait to learn all about Venice, Rome, Cortona, Florence, and most importantly learn all about glass blowing in Murano! I hope to come back stress free and inspired...and maybe full of great food and lots of wine! Here's to exploring the old world in order to inspire my artsy world here in Iowa!

Adventures of an Artist "In Italy" to follow on future blog posts! :) Arrivederci!

Wednesday, June 8, 2011

Coffee Filter Fun!


I've been counting down the days till my big trip to Italy and I'm getting so excited! 6 days left, and I'll be walking the streets of Rome, Cortona, Florence, and Venice! I'll be posting pics of the packing situation hopefully before I go... should be pretty funny considering I've purchased enough new clothes to fill 2 full size suitcases... not the (1) carry on I'm allowed for the whole trip! Yikes!

So in the midst of all of the hustle and bustle, I decided to clean up my dining room, clear off the table, and wrap a birthday present. I dug the wrapping paper out of a bin in the basement. The price tag said 49 cents, and I'm pretty sure I purchased it about 5 years ago -go figure! Once the gift was wrapped it just didn't seem right to put a christmas bow on the crisp green and white paper, so I dug around in the kitchen and found some coffee filters! 

Below are the instruction on how to create a "make-shift bow" out of coffee filters! (I'm still working on my coffee filter light fixture... 5 months 1560 coffee filters and still working - that thing will get done one of these days!)


1) Take the coffee filter, lay it flat on the table and fold in Half.


Once folded in half fold it again. (In fourths)


Now in half again. (8th's)


Now that the Coffee Filter is folded in 8th's, cut the pointed end off in order to give yourself a nice area to affix to the object you are making.  For the light fixture project i'm in the process of finishing I used hot glue, for this project I used Scotch Tape.


Arrange the filters in a Bow like Pattern. The smaller gift I used about 25 filters, taped them in a central radial bow shape with edges that shot out from the right and left. After taping to the package I went in and "fluffed" the filters to make them poof off the package. Remember "poof" is key :).


For the larger box I laid the outside filters first creating a frame that followed the edge of the box, then filled the middle in with a line of filters stacked like fallen domino's then fluffed to fill the holes! This process strangely reminded me of back combing and fluffing my bangs in the early 90's - examples below....

Wow look at those bangs!

I think we gave Mel a few pills to calm her nerves before the big performance...

More finished product shots below -  remember the next time you wrap a gift that for 49 cents and a few filters your gift can look like a million bucks! Enjoy!